Blockchain is a growing technology, expected to be of increasing significance in the future. Although it came into the limelight with the emergence of Bitcoin, it has a much wider use than providing the digital ledger behind cryptocurrencies.
So what exactly is a blockchain?
A blockchain is a distributed, digital ledger that is decentralised across multiple nodes in a peer to peer network. Each node on the network maintains its own copy of the ledger which is agreed by consensus, so there is no need for a centralised copy. Depending on the use case, the network may be public or private.
 |
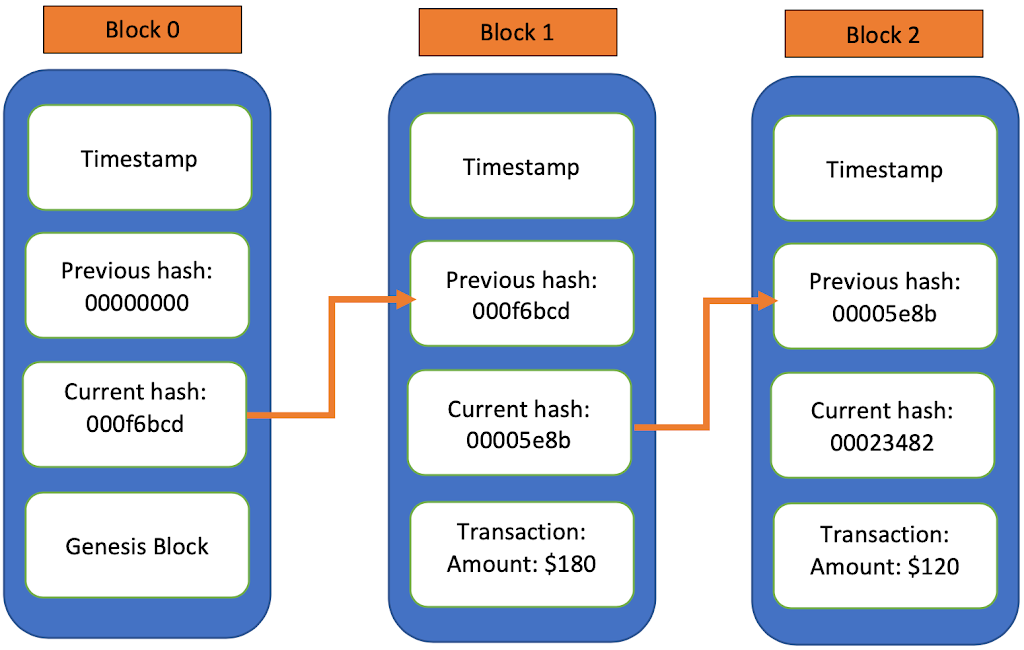
| Illustrative blockchain |
Transactions are recorded in timestamped blocks, where each block is cryptographically sealed through a consensus algorithm such as proof of work, where the hash of the blocks contents form part of the input to the next block in the blockchain. The ledger is thus append only, with the sequence of blocks forming a blockchain.
The hash for each block is mined through adding a nonce value to the block contents, until a hash is yielded that meets a predefined difficulty criteria, such as the number of leading zeroes. This proof of work consensus algorithm is important, because the resultant hash is difficult to derive, but easy to verify once created.
This attribute of immutability makes a blockchain highly tamper resistant, since the integrity of subsequent records relies on the integrity of previous records.
For an example of the detail of Bitcoin blocks, visit the Blockchain Explorer.
Blockchains have many different use cases such as, cryptocurrencies, digital voting, asset ownership or rental, supply chain management, chain of custody, maintaining healthcare records and managing digital identities.
The best way to learn about a concept is by practical examples, so in this post we will build a simple localised blockchain using Python. (Implementing the blockchain on a peer to peer network, we leave as an additional exercise for now)
All we need for this project is a standard Python install, so once that is done, let’s get started!
First we need to create a blank file called blockchain.py and import the sha256 method from the built-in hashlib module, which will be used to calculate the block hashes and to mine the blocks. To record a timestamp on each block, we also need to import a datetime object:
from hashlib import sha256
from datetime import datetime
Next we will create two classes, Block and Blockchain, in which we will implement our blockchain functionality.
A Block object is initialised with an index, which corresponds to the index on the Blockchain instance on which it resides. It also required a record of transaction(s), the hash from the previous block, proof of work difficulty, a timestamp at time of creation and an initial nonce value. This data is all fed into a hashing algorithm, which recalculates in a loop with a new nonce value each time, until a suitable block hash is found that meets the predefined difficulty level.
class Block(object):
    """Methods and attributes for the Block class"""

    def __init__ (self, index, transaction, previousHash, difficulty):
        """Constructor for Block object"""
        self.index = index
        self.transaction = transaction
        self.previousHash = previousHash
        self.difficulty = difficulty
        self.timestamp = datetime.now()
        self.nonce = 0
        self.hash = self.mineBlock()
Before we implement methods to calculate the block hash and to mine the block, we add a __str__ dunder method to the class in order to take care of printing the block’s contents:
    def __str__(self):
        """Return a string representation of the Block contents"""
        block_string = ''.join([
            "index:        " + str(self.index) + 'n',
            "timestamp:    " + str(self.timestamp) + 'n',
            "difficulty:   " + str(self.difficulty) + 'n',
            "nonce:        " + str(self.nonce) + 'n',
            "transaction:  " + str(self.transaction) + 'n',
            "previousHash: " + self.previousHash + 'n',
            "hash:         " + self.hash + 'n'
            ])
        return block_string
Next, we create a class method to calculate the hash of the block contents, which will be used in the mining algorithm, as well as to check the validity of successive blocks later on in the project example. The SHA256 hash is calculated by taking as input the concatenation of all the other block contents:
    def calculateHash(self):
        """Calculate a hash based on the Block contents and nonce value"""
        hash_string = ''.join([
            str(self.index),
            str(self.timestamp),
            str(self.nonce),
            str(self.transaction),
            self.previousHash
            ])
        return sha256(hash_string.encode('ascii')).hexdigest()
A mining class method, repeatedly executes the above calculateHash method, changing the value of the nonce variable on each iteration, until a valid hash that meets the difficulty criteria is found. (For example, difficulty of 4 means that a valid hash must have at least 4 leading zeroes):
    def mineBlock(self):
        """Find a valid hash for the Block contents, based on difficulty"""
        while self.calculateHash()[:self.difficulty] != ('0' * self.difficulty):
            self.nonce += 1
        return self.calculateHash()
That should be all we need for the Block class, now let’s have a look at the Blockchain class. We initialise the class with an index of zero, a difficulty level (set to level 4 if none is specified) and create the list (chain) where our Block objects will be stored.
class Blockchain(object):
    """Methods and attributes for the Blockchain class"""

    def __init__(self, difficulty=4):
        """Constructor for the Blockchain object"""
        self.index = 0
        self.difficulty = difficulty
        # create Genesis Block on the chain of Blocks
        self.chain = [Block(self.index, 'Genesis Block', '0'*64, self.difficulty)]
The list, self.chain has as its first item at index 0, the Genesis Block in the blockchain. A Genesis Block has no previous block to which it is connected, so we set the previous hash value to a string of sixty four zeroes.
We need a method to add new Block objects to the Blockchain, which we do with the following class method:
    def addBlock(self, transaction):
        """Add a new block to the Blockchain"""
        self.index += 1
        newBlock = Block(self.index, transaction, self.getLastBlock().hash, self.difficulty)
        self.chain.append(newBlock)
The addBlock method first increments the index by 1, then creates a new Block object using the data (transaction) passed in through the method’s parameter. The new index number, transaction data, hash from the previous block and the difficulty are passed as parameters to the new block.
To get the hash from the previous block, we implement a class method getLastBlock, which returns the last item in the list, chain:
    def getLastBlock(self):
        """Return the last block in the Blockchain"""
        return self.chain[-1]
The last method we need to add to our Blockchain class is the checkChainValid method, which iterates through every block in the blockchain and recalculates the hash to verify that it is valid based on the block’s contents and also verifies that the block’s previous hash value agrees to the actual hash value of the previous block. The method returns a boolean value.
    def checkChainValid(self):
        """Verify the integrity of the Blockchain"""
        for i in range(1, len(self.chain)):
            currentBlock = self.chain[i]
            previousBlock = self.chain[i - 1]
            if currentBlock.hash != currentBlock.calculateHash():
                return False
            if currentBlock.previousHash != previousBlock.hash:
                return False
        return True
So that should take care of our blockchain.py file.
Now in the same directory, let’s create a new file example.py to test how this all works.
In the new file, we need to import the blockchain module that we have created.
import blockchain
Next we create a new Blockchain object called myCoin and print the contents of the first block in the chain, the Genesis Block.
# initialise Blockchain with difficulty of 4
myCoin = blockchain.Blockchain(4)
# print Genesis Block contents
print(str(myCoin.chain[0]) + 'n')
If you run this code you should get an output of the Genesis Block contents similar to the below:
index:        0
timestamp:    2020-05-04 00:16:08.649298
difficulty:   4
nonce:        42642
transaction:  Genesis Block
previousHash: 0000000000000000000000000000000000000000000000000000000000000000
hash:         000014d2caaa9a859e4c166762849a5a365374912930637f9a497e02d8af6a0f
Notice that the hash that has been mined for the block matches our difficulty level of 4 (i.e. has at least 4 leading zeroes). A higher difficulty level will take exponentially longer to mine the hash. Try it out with a difficulty of 5, or even 6 to see what happens.
Next we create a list of transactions and add each item in the list to a new block, printing out the contents of each block after it is created. (In practice, transactions may be grouped together in batches, instead of each being added to their own block)
transactions = [
    {'Sender':'abc@example.com', 'Beneficiary':'xyz@example.com', 'Amount':4},
    {'Sender':'def@example.com', 'Beneficiary':'ghi@example.com', 'Amount':10},
    {'Sender':'jkl@example.com', 'Beneficiary':'pqr@example.com', 'Amount':8}
    ]

# process transactions each in a new block and print mined block contents
for transaction in transactions:
    myCoin.addBlock(transaction)
    print(myCoin.chain[-1])
    print
Running the above code will generate three additional blocks and print out the contents. Notice how the value of the variable previousHash in each block, matches the actual hash variable in the previous block. Remember that the previousHash variable forms part of the data used to calculate the hash variable for each block.
index:        1
timestamp:    2020-05-04 00:16:08.949637
difficulty:   4
nonce:        162649
transaction:  {'Beneficiary': 'xyz@example.com', 'Amount': 4, 'Sender': 'abc@example.com'}
previousHash: 000014d2caaa9a859e4c166762849a5a365374912930637f9a497e02d8af6a0f
hash:         000039996653ac98fc66fe0b53a9c53414d08ebc046b6ec9fd135ff8be2c33a2
index: 2
timestamp: 2020-05-04 00:16:10.307056
difficulty: 4
nonce: 77000
transaction: {'Beneficiary': 'ghi@example.com', 'Amount': 10, 'Sender': 'def@example.com'}
previousHash: 000039996653ac98fc66fe0b53a9c53414d08ebc046b6ec9fd135ff8be2c33a2
hash: 0000f69a99d226be7c1350a6c868bed4f42e2113d4584eb635a298a3b98564ee

index: 3
timestamp: 2020-05-04 00:16:11.007089
difficulty: 4
nonce: 47638
transaction: {'Beneficiary': 'pqr@example.com', 'Amount': 8, 'Sender': 'jkl@example.com'}
previousHash: 0000f69a99d226be7c1350a6c868bed4f42e2113d4584eb635a298a3b98564ee
hash: 0000e87c01616cb3220ef95ca0b999d709d57c74820547a315acf3541240caa8
So it looks like our simple blockchain is working, but what happens if we tamper with some of the data? Will we be able to detect this?
Let’s first verify the current blockchain’s integrity by using the class method checkChainValid.
# Check if chain is valid (should return true)
print('Blockchain integrity is valid? ' + str(myCoin.checkChainValid()))
This should provide an output:
Blockchain integrity is valid? True
If we change the data in one of the blocks and again verify the validity of the blockchain, we should get a different result:
# Now let's manipulate the data to invalidate the Blockchain
myCoin.chain[1].transaction = {'Sender':'abc@example.com', 'Beneficiary':'def@example.com', 'Amount':12}
# Check our chain again (should return false)
print('Blockchain integrity is valid? ' + str(myCoin.checkChainValid()))
The integrity check should now yield a False result, since the recalculated hash of the edited block doesn’t agree to the hash variable associated with the edited block.
Blockchain integrity is valid? False
You will notice that even if we recalculate the hash based on the new transaction data and update the hash variable, the validity check will still return False, since the previousHash variable in the next block will no longer match:
# even if we update the hash to the new transaction, validity will still fail
myCoin.chain[1].hash = myCoin.chain[1].mineBlock()
So we now have a working blockchain, which we can use to illustrate a few blockchain concepts. Obviously there are a lot more considerations that would need to be implemented before this could be useful in a real world blockchain implementation. For example, we haven’t considered how consensus would be achieved across a peer to peer network.
Both files created in this project are available for download from Github.